If clutter and insufficient internal storage space on your Android are getting you down, then read on: this article won’t just tell you to clean caches, uninstall apps and the like (which we believe are only marginally and temporarily effective), but will get to the heart of the problem with recommendations that make a significant impact.
The thing is: for those of us who have insufficient storage problems, clearing caches and junk files has become a weekly – if not daily – ritual. But it isn’t supposed to be this way: there are better interventions out there that are a lot more significant, that can really make a dent in freeing up space from your Android’s internal storage. This post compiles TEN interventions in total and ranks them according to the potential impact they can have.
There are three ‘categories’ of interventions that you can perform, as follows:
- Those that can be done on any Android device.
- Those that require an external SD card connected to your device.
- Interventions that you can do if your device is rooted.
Below is a list of useful FREE tools that are mentioned in this post. However, note that this article is NOT about the tools, but rather aims to provide a useful discussion about how best to tackle the problem of clearing up space on your device.
- Clean Master: one-stop-shop for cleaning functions and batch app uninstalls
- Diskusage: PC style graphical representations of where all of the space on your Android went.
- ES File Explorer: our free Android file manager of choice.
- Framaroot: if you want to take the plunge and unroot your device, this is one of the easiest ways to do it.
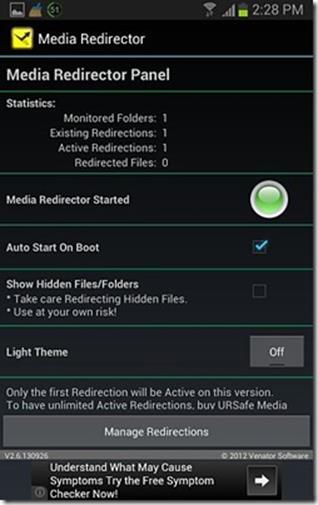
- URSafe Media Redirector: which can move files saved into a certain folder into another one of your choosing.
Here’s the list of recommendations.
My aim was to list those interventions that can have a significant effect first.
(1) Save photos and videos to EXTERNAL SD card by default rather than internal storage
Requires: an external SD Card.
Potential impact (high/med/low): high.
A spree of photo snapshots, a few videos here and there, and your internal storage can be filled so significantly that it makes clearing caches and junk files small fry in comparison. What’s more, this can happen silently, creeping up on you even if you one take a few pictures or videos each day, such that one day suddenly your Android internal storage will be overwhelmed seemingly without explanation.
Of course you can go in and delete your photos and videos and/or move them to your PC (and you should), but the fact is there is really no need to have your small internal storage deal with all these media files while your external SD card has a ton of free space sitting idle, especially if your internal storage already has a lot on it’s plate.
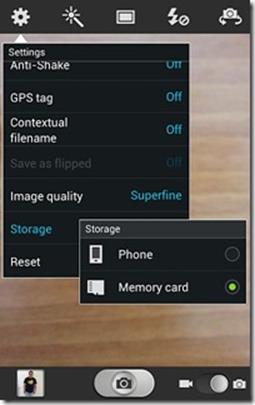
The good news: you can set you camera to save straight to your SD card, so you wouldn’t have to always worry about your media suddenly overwhelming your device or bogging down your Android OS. It’s actually very easy to do this: go to your camera app/settings/storage and select memory card (see screenshot above right), and you’re done.
(2) For all media intensive apps: set the save folder to EXTERNAL SD (e.g. Podcatchers, music sharing apps, wallpaper downloaders etc.)
Requires: an external SD Card.
Potential impact (high/med/low): high.
I use my Android to download and listen to podcasts, and I subscribe to many channels, and (predictably) one day I realized that my downloaded podcasts are eating up most of my internal storage. Worst of all, this happened slowly, one automatically-downloaded podcast at a time, without me ever realizing what was going on, until all the internal storage space was occupied and my device choked.
So ask yourself: what apps do you have that download media consistently?, whether it’s audio podcasts, mp3’s, videos, or images. Consider any of these categories: podcatchers, music sharing or streaming radio apps, video sharing or streaming video apps, voice note apps, camera apps that might store images or video in custom folders aside from the default folder (mentioned in point #1 above), wallpaper downloading apps, etc. The Diskusage app mentioned at the top of this article can help shed light on this by revealing bloated folders.
What to do when you’ve identified a space-hogging app? One of four things
- Change the default folder where the app saves data: go into the app, and look in the settings/options. In many cases the default save folder can simply be changed. If so, switch it to external SD card.
- Change the frequency of saving data: which is to say, limit how much data is being downloaded. Tell your Podcatcher to only keep a small number of episodes for each podcast you subscribe to, or tell it to stop downloading episodes automatically, etc.
- Find a different app that does the same thing but will save to external SD card and/or is more flexible: what I mean, specifically, is that if the application is not adaptable enough to let you save to the external SD card rather than internal storage, or will not let you change the frequency of downloads, or whatever, get rid of it and find one that will. To keep with the ‘Podcatcher’ example, there are many excellent free options out there to choose from, no reason to stick with one that won’t let you customize the save folder.
- Get rid of it: do you even use that app? If not, or if you use it rarely, getting rid of it might be the best course of action.
(3) Check to see if there’s a LOGS folder hogging a ton of space on your internal storage (non root)
Requires: nothing.
Potential impact (high/med/low): high.
This can happen with Android: a ‘logs’ folder appears that can grow extremely huge, for reasons that aren’t entirely clear to me (if you have an insight, please share it). Use DiskUsage or ES File Explorer (or any file manager) to check if there’s an sdcard/logs folder. You may not find it, but if you do, check to see how much space it is occupying. In my experience I found that the logs folder had inexplicably grown to 125 megs, and simply deleted it without any adverse effects. Obviously if the folder size is insignificant, you may as well not remove it.
(4) Check to see if there’s a LOGS folder hogging a ton of space on your ROOT folder (root)
Requires: root.
Potential impact (high/med/low): high.
Similar to point #3 above, but requires a rooted device, because you’re looking for a ‘logs’ folder in the root folder (/). I am speaking from experience as I did find such a folder myself (again, without much of an explanation) that had grown to more than 1 GIG in size, deleted it, and as you might imagine my internal storage problems disappeared immediately.
If you are suffering from a nagging ‘low storage available’ error that never seems to go away no matter how much space you clear, this may be the problem. It requires rooting your device to fix this (if you’re up for it and looking for a simple way to root, check out aforementioned Framaroot).
(5) Move apps to SD Card
Requires: an external SD Card.
Potential impact (high/med/low): med to high. (depending on how many apps you’ve installed).
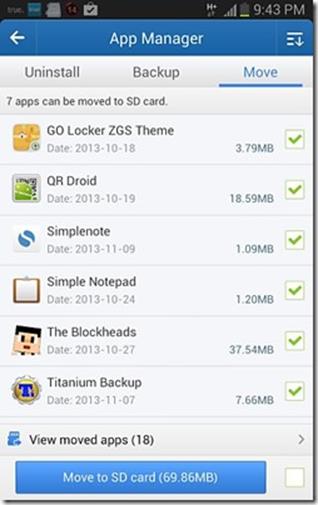
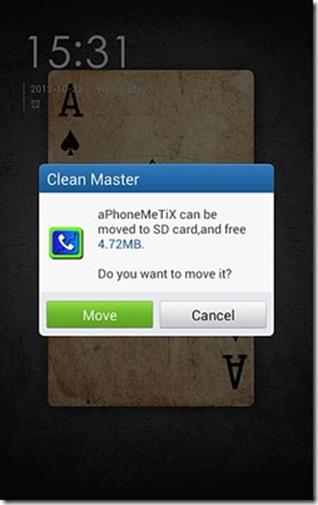
Three things: (1) if you have an external SD card you really need to move most or all of your apps over; (2) some apps are not moveable, others will lose widget functionality or other functionality if moved, but Android will let you know before you commit to the move, and (3) you could do this individually/manually for each app from the ‘App info’ screen in the settings, but better to use a program such as ‘Clean Master’ which can automate the process and do it in batch. (It will also display a notification whenever you install an app that can be moved to the external SD card, that will let you move them on the spot as soon as they’re installed).
In the screenshot bottom left: the ‘move’ tab in ‘Clean Master’ lists all apps that can be moved to SD card; check all of the ones you want to move in batch (although for non rooted devices you will have to press the ‘Move App to SD card’ serially for one app after another). The bottom right screenshot demonstrates Clean Master’s automatic prompt to move an app to SD card as soon as it was installed.
(6) Change the default folder where your Android screenshots are saved to one on the EXTERNAL SD card
Requires: an external SD Card.
Potential impact (high/med/low): low to med. (depending on how many screenshots you take, if any).
Do you take screenshots on your Android? If not, skip this as it does not apply to you. However, if you are like me and take frequent screenshots for reviews and tutorials, then you can see how these would silently build up.
But the thing is: unlike the ‘camera’ media folder (point#1 above), there is no way to change the screenshot save folder in most Android devices, unless you using a custom screenshot app that may offer this. Moreover, the screenshot folder itself may be different depending on the device that you have.
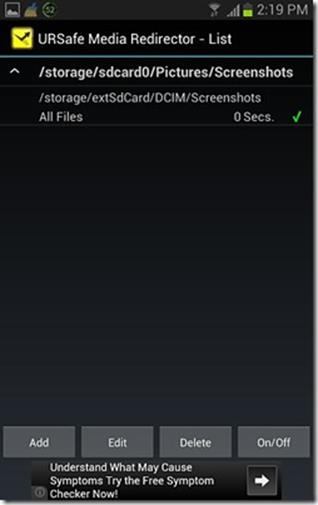
But of course I will propose a way to do it, using an app that runs in the background and re-routes files saved into a folder of your choosing into another one, also of your choosing.
- Install URSafe Media Redirector and run.
- Click ‘manage redirections’ (bottom) then ‘add’. Click ‘path from browse folder’ button and browse to the screenshot folder, then press ‘path to browse folder’ button and specify a location on the SD Card, and finally toggle ‘Activation switch’ on and save.
- In the main screen, click the red ‘Media Redirector Started’ button, to turn it green, and make sure that the ‘Auto stat on boot’ checkbox is checked.
Note that (a) the free version of this app allows only ONE active redirection rule, and (b) this can work with just about any app that insists on saving files to a folder on the internal storage, but it will move the files in a one way redirection. (Which is to say if the app comes back looking for them in that location, it will simply not find them).
(7) Clean your ‘junk’ and cache files
Requires: nothing.
Potential impact (high/med/low): low to med. (depending largely on how recently your last cleanup took place, and how many apps you run).
This is something which you need to do periodically. These files include CACHE files for most apps, APKs (i.e. Android app installers) that may still be lingering around on your device, temp files and folders, etc.
Clean Master does a good job with this. You can do the ‘standard’ cleanup pretty much at will, but be careful what you are deleting if you switch to the ‘advanced’ tab. The advanced tab has a nice function whereby it will find and list the biggest files on your device, which can be very useful and impactful, just in case you forgot all about that 700 MB video file that you were watching on the bus six months ago.
(8) Uninstall apps you do not use
Requires: nothing (well, willpower)
Potential impact (high/med/low): low to med. (depending on how many apps you install and whether they are big or small).
If you install a lot of apps you may already suspect, somewhere deep inside, that all of these added apps aren’t really adding to your overall user experience, and that most of them are just occupying space and will rarely, if ever, be used.
So go ahead and remove half of them, or at least a third. You will feel strangely better. Note that ‘Clean Master’ is an excellent batch uninstaller that will let you check all of the apps you want uninstalled and uninstall them all in batch, one after another. It also will rank/sort your app list by date of installation as well as by size (in MB).
(9) Uninstall bundled apps that came with your device that you do not use (ROOT)
Requires: root.
Potential impact (high/med/low): low (but somehow feels really good).
Doors open when/if you root your device; suddenly, many (though not all) of the apps that came pre-installed when you bought your device, that you NEVER ever use. I would advise to back these apps up first, though (Clean Master can do it). This is because in case you want them back you may not be able to go to Google Play and simply reinstall them.
(10) Check to see if your Android suffers from the ‘Bloated Contacts Storage’ bug, and fix it.
Requires: nothing.
Potential impact (high/med/low): low to Med (but really ought to be fixed anyway).
On some devices, the contacts list will grow into a much larger size that it should, eating up space silently and invisibly. This issue may be related to having multiple GMAIL accounts with large numbers of Google+ contacts, but I don’t really know for sure.
I cannot expound too much about this, since I have not experienced it myself on any of my devices, but I thought I would list it here because I like to be as comprehensive as possible (and anyway ‘Ten ways to bla bla’ sounds a lot better than ‘Nine ways’ in a title
In any case the solution seems to involve finding out if you do have the problem, exporting/backing up your contacts and then reimporting them (with some steps in between). For more info on this here’s a Google search that might help.
Via: freewaregenius


Leave a Reply